
 In part 2 of this series, we follow a step-by-step process for creating a resource pool in Microsoft Project. Use this tutorial to create a new resource pool, and then attach that pool to a set of projects. An archive of the files shown in this tutorial can be downloaded here, so you can splash around poolside while you work this out.
Part 1 of this deep dive teaches the theory and usefulness of Microsoft Project resource pools.
This tutorial requires some basic working knowledge of Project. Particularly useful during this exercise is knowing how to add columns and fields to a few stock views.
Step 1: Create a new blank project and name the file in such a way that everyone will know it is a resource pool file, and not a project file.
Enter all the resource data you anticipate sharing across projects. Feel free to add columns with fields that make your pool more robust. You can create new resources from scratch, or add them from your Address Book by going to the Resources ribbon and clicking on Add Resources | Address Book… If you’re using Project Professional, you can even pull from your enterprise’s Active Directory.
Since I’m often interested in separating out my resources by external contractors, internal staff and materials, I have used the Group field to do just that. I’ve also added a few new columns, such as Expertise, Company and Country columns, and hidden many of the default columns that I don’t really need to see — so be creative here!

Save your work when done, but leave the resource pool file open. You need that open in Step 2.
Step 2: Open a project file that you wish to draw on from the pool. Then go to the Resources ribbon and click on Resource Pool | Share Resources… Check the radio button Use resources (which requires at least one open resource pool) From:. You should see your open resource pool in the dropdown:
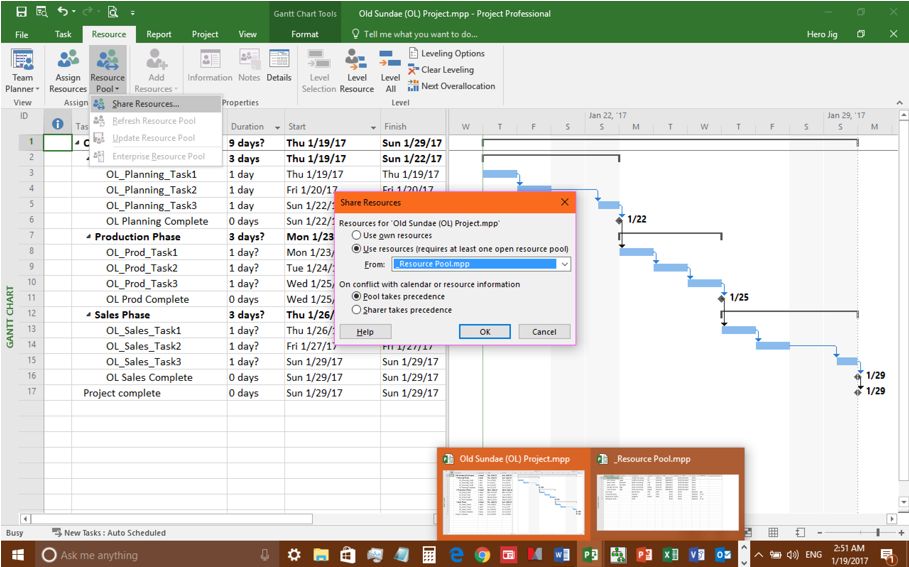
By letting the Pool take precedence, you’re telling Project that you want the resource pool to help you schedule new resource assignments as you add resources to tasks (recommended). Click OK and away you go. Repeat this step for every project that you want to link to your new resource pool.
Step 3: You’ll now see that each linked project’s Resource Sheet populates with the contents of your resource pool. If you’re linking to an existing project that already has resources included, those resources are “thrown in the pool” as well. In short, your resource pool grows over time, learning just who is working on your complete set of projects:

When both a project file and a linked resource pool is open (see above), you can edit either resource sheet and your entries are synchro-delicious. The illustration above also shows the default layout for the view in the project file, and a customized layout in the resource pool file. You can tailor either to suit, but I recommend leaving the default set of columns in project files and making all your customizations in the resource pool.
Step 4: Now you can assign resources to project tasks as you normally would (either from the Resources Tab or from the Task Form); and this same list will now appear in all linked project files:

That’s it! Your resource pool is now on the job and working hard. So now let’s look at how you can benefit from all your hard work…
Getting the Most from Your Pool in Real Life
First, you can quickly modify the Resource Usage view inside your pool file to get a handle on your resources across all of your projects. In this sample I’ve sorted resources by work groups (external contractors vs. internal staff) and made a nice display:

In this single view you can see who is assigned which tasks across all projects, as well as what firm they work for and how many total hours of work each person is assigned. You can also get your costs at a glance, by simply adding a Cost column to the view. In addition, this Resource Usage view has a breakdown of work by person in days, weeks, months, etc. in the timescale on the right.
As a best practice, I also like to attach each contractor’s terms of reference or signed contract right here in the resource pool. The Notes column (Indicators) is great place for that.
In addition to having a great view of your project resources overall, the resource pool will also let you know when you have over-allocated resources across your project set. You get notified in both the resource pool…
![]()
…and the project file.

Next, you can use the Report ribbon to generate some nice bar, pie and table charts based on your collective resource data from your projects — in just a few clicks!

Part 1 of this deep dive teaches the theory and usefulness of Microsoft Project resource pools.
Image Source
